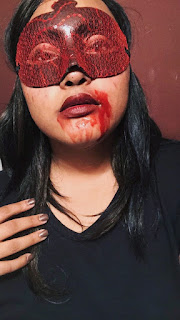
Friday the 13th
is one of my favorite horror films. Aside from the Nightmare on Elm Street and
Halloween series’, the Friday the 13th series is one I can watch
over and over again. I even have a tiny Jason Voorhees that sits on my dresser
and watches me while I do my makeup. It’s casual.
So of course I had to
recreate one of my favorite costumes that I’ve ever done. This is also probably
one of the easiest special fx looks that I’ve ever done because it involves no
liquid latex.
What you’ll need:
Eye shadow
Cream paints
3D Blood Gel
Coagulated Blood
Camp Crystal Lake shirt (I’ll link to the exact one I have)
Start by painting
your face to look as dead as possible. Using my eye shadow pallet, I darkened my
eyes using greys and dark brown to create a sunken-in appearance. Add more
shadow as you go until you get your desired look.
Once you have that
down, use your cream paints to start creating bruises and trauma around your
face. I started by using mixing red and purple together, stippling on the color
with a cosmetic sponge around my eye bone, cheek, and mouth. Add more color in
the places where you want the deepest bruises to be. Incorporating brown and
black helps to add depth to your bruises – this also helps when you figure out
where you want your wounds to be.
Use an eyeliner to
map out the places you want to lay the blood gel. Fill a mug with water and
heat it up so that you can place your blood gel into it to get it warm. This
makes the gelatin easy to use. When you take the gel out of the mug, wait until
it gets warm to place it on your skin, please do not use it while it’s still super-hot.
Use a spatula or a pallet knife to place the gel onto the places where you want
your wound. Apply as much as you want, using your tool to smooth it out and add
texture to the skin. You'll want to work fast so that the gel is still warm. It's easier to use while it's still warm because it starts to clump as it cools and then it will not stick onto your skin as well.
You can create whatever kind of wound you want, make it
look as simple or as gory as you choose. This gel is easy to manipulate and it’s
more simple that liquid latex. Plus, it’s good for those that have a latex
allergy.
Once your gel has
dried a bit, use a black cream shade to darken certain places around the wound,
the create depth. Use your coagulated blood to fill in certain areas around
your wound and face. A helpful tip: add black eye shadow or cream paint to certain areas of the gel to darken it. The blood gel is a bright red and this helps to make it look more dried and add dimension. Now, it’s all about aesthetic. Use your materials to add
any finishing touches you want.
And you’re finished!
This is a fast and
simple way to create an undead look for Halloween. It’s also great for anyone
that loves Friday the 13th as much as I do. You can find these
materials from any Halloween store for extremely cheap. I found my coagulated
blood and 3D blood gel from Spirit Halloween for under $6. You can also find them on Amazon. Everything else were
things I already had lying around. The camp counselor shirt is one I’ve had for
years from Rotten Cotton, a great places to find horror movie shirts. I have
one more tutorial left to put up. Even though it’s already Halloween, we all
know I enjoy being spooky all-year around.
Happy Halloween!


